• Home
  • About
  • Vegan
  • Gluten Free
  • Chocolate
  • Cookies
  • Cupcakes
  • Cake
  • No bake/ Raw
  • Savoury
  • Natural Health
  • yoga
  • Tradtional
  • juice

VeganEtcetera

~ Eating healthily easily

VeganEtcetera

Author Archives: Aissa

Armadillo Apple Pie or Armoured Irish Apple Tart

28 Sunday Sep 2014

Posted by Aissa in Tart, Traditional, Vegan

≈ Leave a comment

Tags

Apple Pie, Apple Tart, Pie, Tart, Traditional, Vegan

My lack of bloggin’ is disgraceful. I was down with brief cold and then on holidays. So no sympathy necessary as I was in Italy for a week! One of my key phrases was senza formaggio! 🙂

I have returned in perfect time for Irish Apple season! First day back and my friend who recently moved to the countryside brought me beautiful yellow cooking apples from her garden. Apple Pie or Apple Tart it is! I have made it with green tart Granny Smiths and  I made it last year with Braeburn apples from my sisters garden. Every time the apples have been different! Cooking apples tend to be tarter and more firm. Depending on your variety of apple you should adjust the sugar levels. If you are using a eating apple maybe reduce the sugar by a dessertspoon or so.

I really should have used six apples this time as two were rather small

I really should have used six apples this time as two were rather small

The spelt gives the pastry a depth of flavour, a little nutty. Spelt’s gluten is a little more brittle which makes it easier to digest. That brittle gluten is the reason I balance it some strong white flour so that the dough can be handled well and rolled out nice and thin.

The wonderful Vegan Pie in the Sky book by Isa Chandra Moskowitz & Terry Hope Romero was a good source of tips when I was perfecting this recipe. Esp. the apple cyder vinegar to stop the dough becoming tough when working with it!

You will need a few bowls, measures, a 20cm/7.5inch pie/ tart dish and tinfoil.

It is Armadillo Apple Pie or Armoured Irish Apple Tart as the sugar coating gives it a crunchy crust!

The Crust

  • Half a teaspoon of sea salt
  • One and a half cups of wholemeal spelt flour
  • One cup of strong white flour
  • Two dessert spoons of rapadura sugar
  • Six spoons of organic coconut oil
  • Three spoons of olive oil
  • 6-12 dessert spoons of chilled water
  • One dessertspoonful of apple cyder vinegar

Put the dry ingredients into a bowl and stir them together.

Dry stuff!

Dry stuff!

In another bowl mix your coconut oil and olive oil. Add the oils into the dry stuff. Rub the oil into the dry ingredients. The mixture should start to have a mealy pebbly look.

Grab your chilled water and put FOUR dessert spoons of it into a bowl and add your one dessertspoonful of apple cyder vinegar. By the dessertspoonful drizzle the mix over the floury ingredients. Mix each time. Another two dessert spoons of iced water will definitely be needed. Start pressing the mixture together to form your dough. If you end up having to add another six spoons you may have been over generous with the flour or too scant on the oil! The more water the more steam created when it is evaporating off in the oven. So be extra sure not to forget to prick your base to allow the steam out!

Wrap the dough and stick it into the fridge!

The Filling

  • Five or Six peeled and cored apples, sliced thinly
  • One generous third of a cup of rapadura/turbinado/ sucucant sugar
  • Two or three dessert spoons of more rapadura sugar
  • One dessertspoonful of cornstarch
  • Two dessert spoons of wholemeal spelt flour
  • One teaspoon of cinnamon
  • Half a teaspoon of vanilla powder/ one teaspoon of extract
  • One teaspoon of sunflower oil suitable for heating
  • Four drops of food grade lemon oil or the zest of one unwaxed lemon
  • Two dessert spoons of lemon juice
  • Optional: One large dessertspoonful of chopped creamed coconut

Peel, core and slice your apples as evenly as possible and set to one side.

At this stage I start preheating my oven to 200C/ 380F as it takes ages to heat up!

Mix the dry ingredients. In another bowl mix the wet ingredients. Add the oil lemon mix to the dry and stir together. For an extra creaminess add the creamed coconut. Rub the coconut into the mix.

Now toss the apples in the mixture so they are all coated. If using an eating apple be aware sometimes they can be a bit more crumbly and delicate, so handle with care. I cover the bowl with a plate and stick it in the fridge.


Apples covered in filling mixture

Apples covered in filling mixture

Topping

  • One teaspoon of vanilla powder or a generous spoon of extract
  • Two dessertspoonful of rapadura/ caster sugar
  • Two dessertspoonful of cold water

This is to coat the surface of the tart just before you put it in the oven

Putting the Pie/ Tart (“Pitart?”) Together

So you make your dough first and pop it in the fridge. Then make up the filling and put in the fridge if the weather is warm. You can make the topping then too if you like.

Take your chilled dough out of the fridge. Cut it so the lump for the topping is every so slightly bigger than the part for the base. Put the dough for the top back in the fridge.
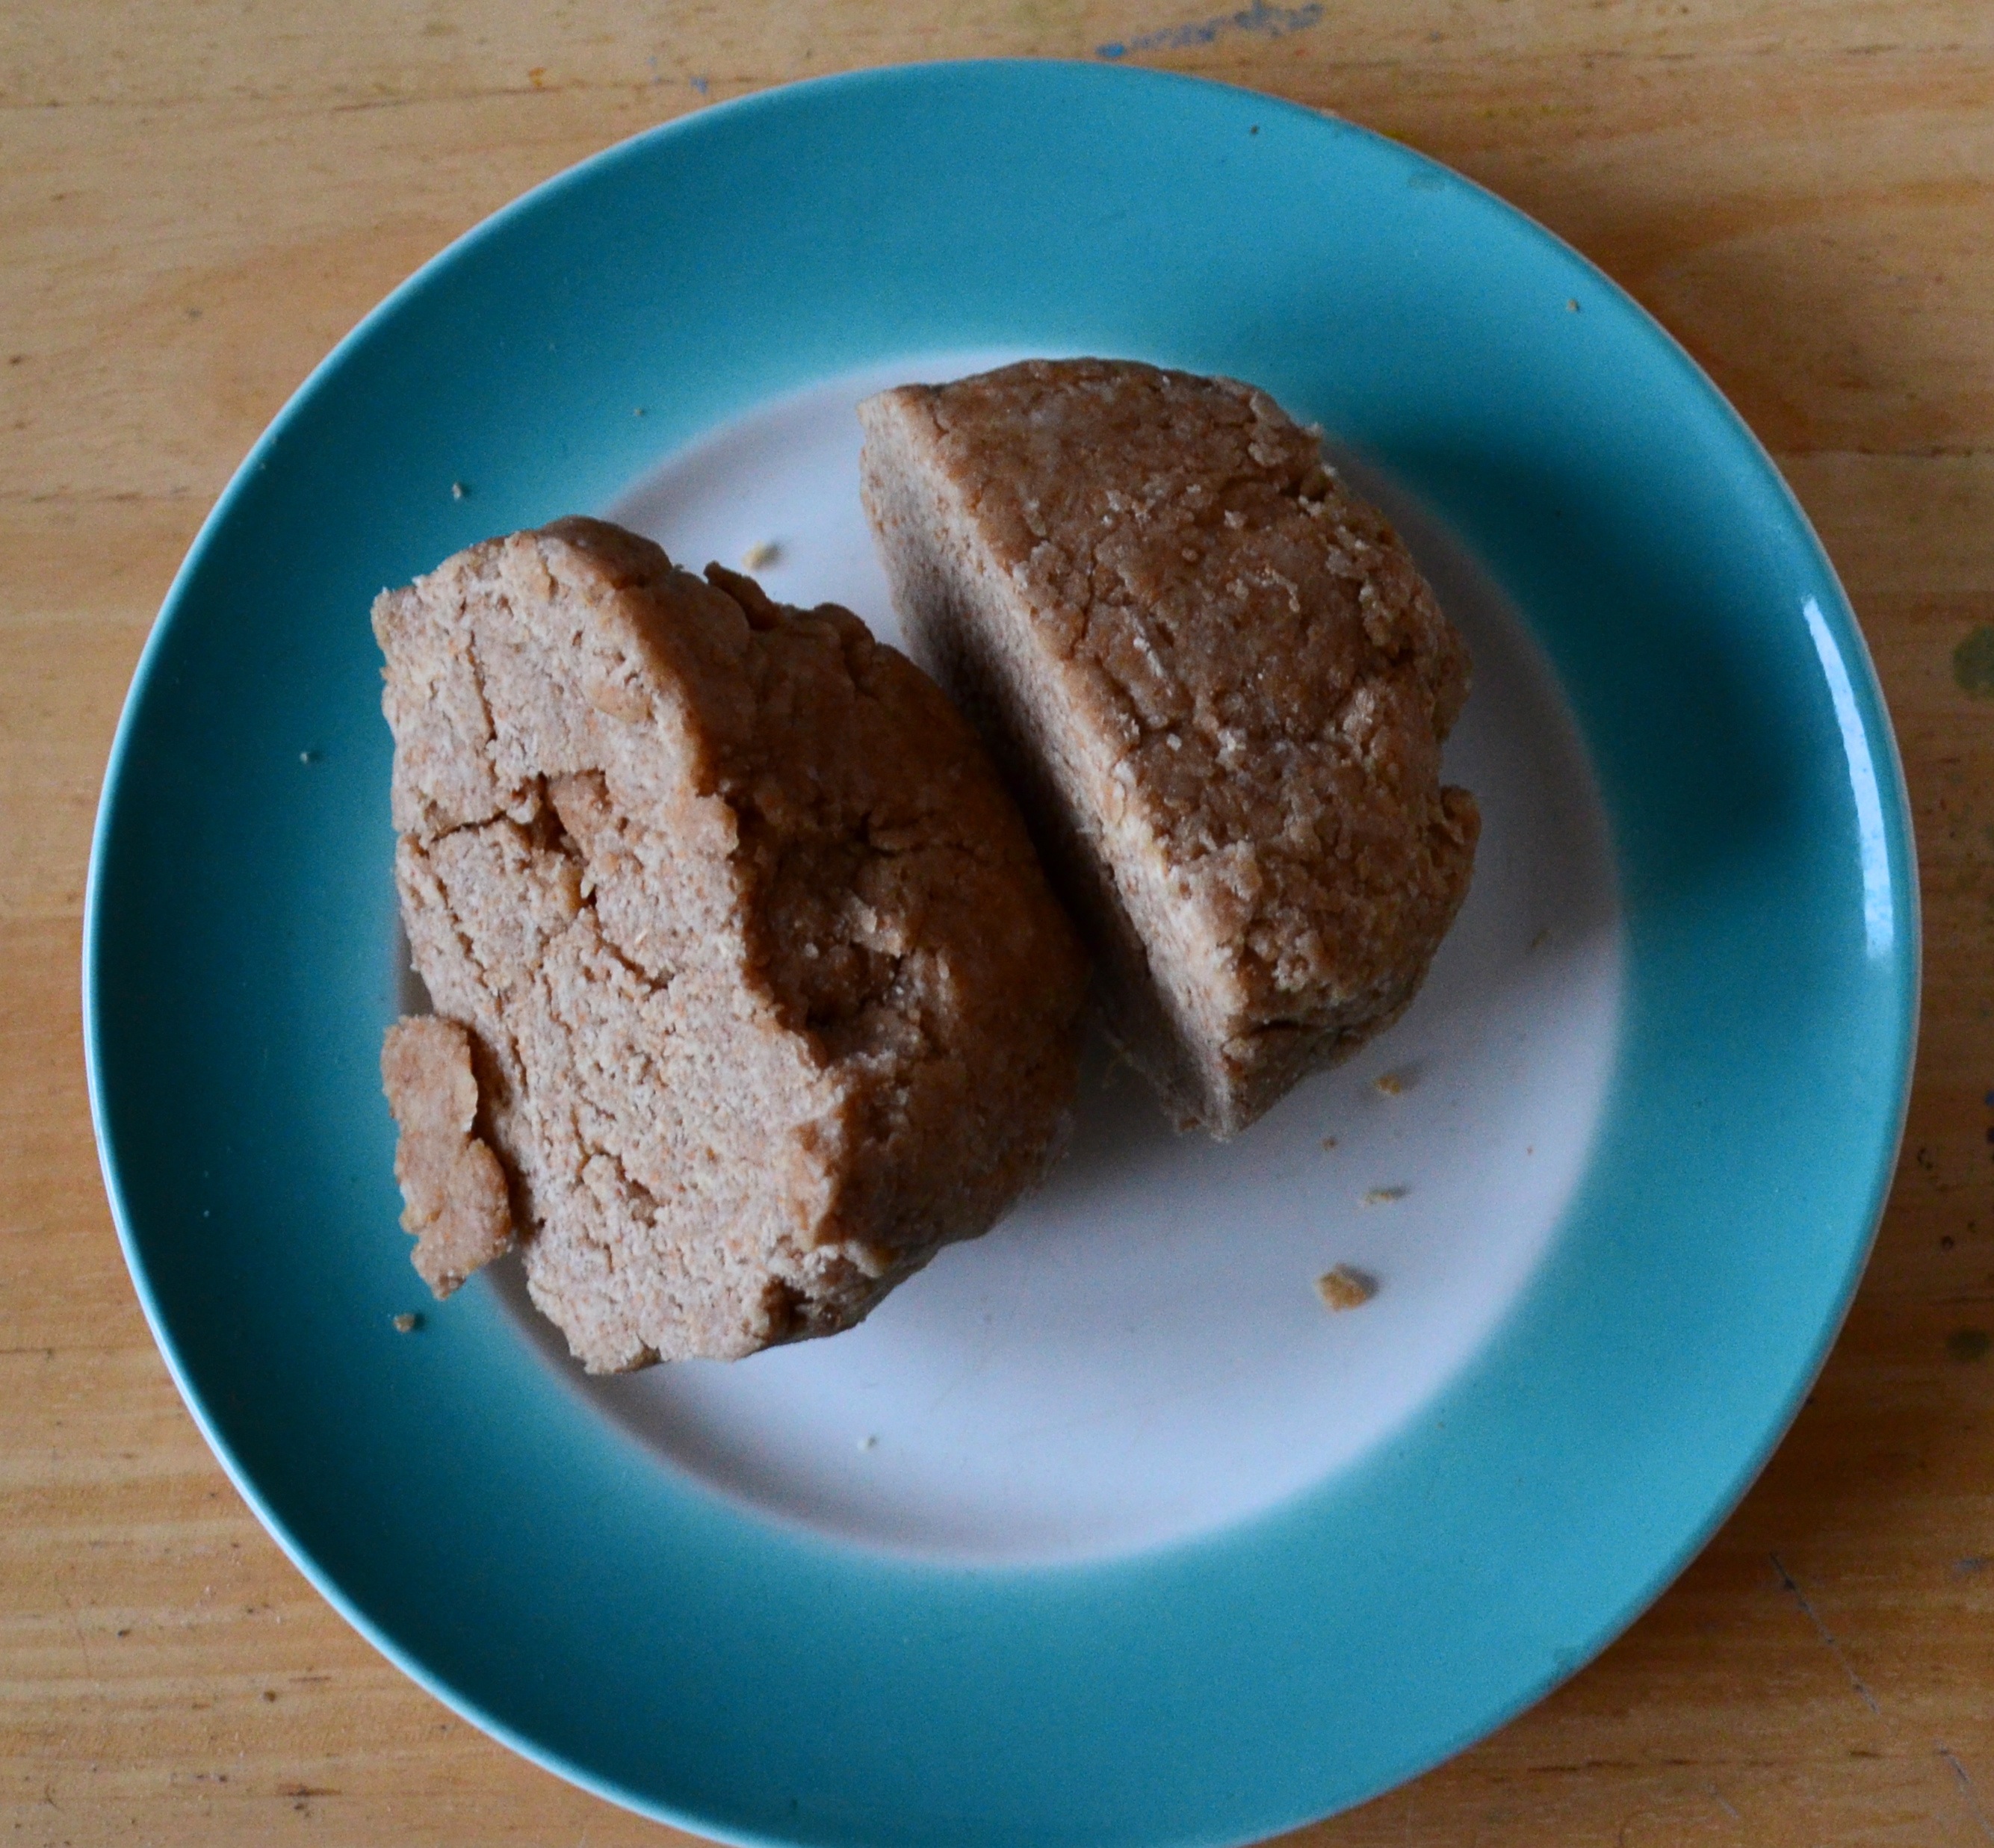
chilled dough

chilled dough

Roll out your base on a clean surface. Check it is the right size by placing your greased 20cm/7.5inch tart/pie dish over it. It should be a little bigger than it so there is enough dough to go up the sides of the dish when pressed in. Roll the dough onto your rolling-pin and unfurl over your dish. Press the dough in, if it is a little uneven at the sides- don’t freak out, you can patch with bits that go over the edge. If there is not enough steal some of the dough set aside for the top and patch it with that!

Prick the base seven or eight times with a fork.

Start Filling! I start in the middle and work my way out in a circle. Overlaying the apple slices. I keep the odd little bits of apple for laying on top, try to spread the gooey filling evenly over the top. It may seem like there is a little too much, but it will shrink as it cooks.

O the bad lighting pitart filling!

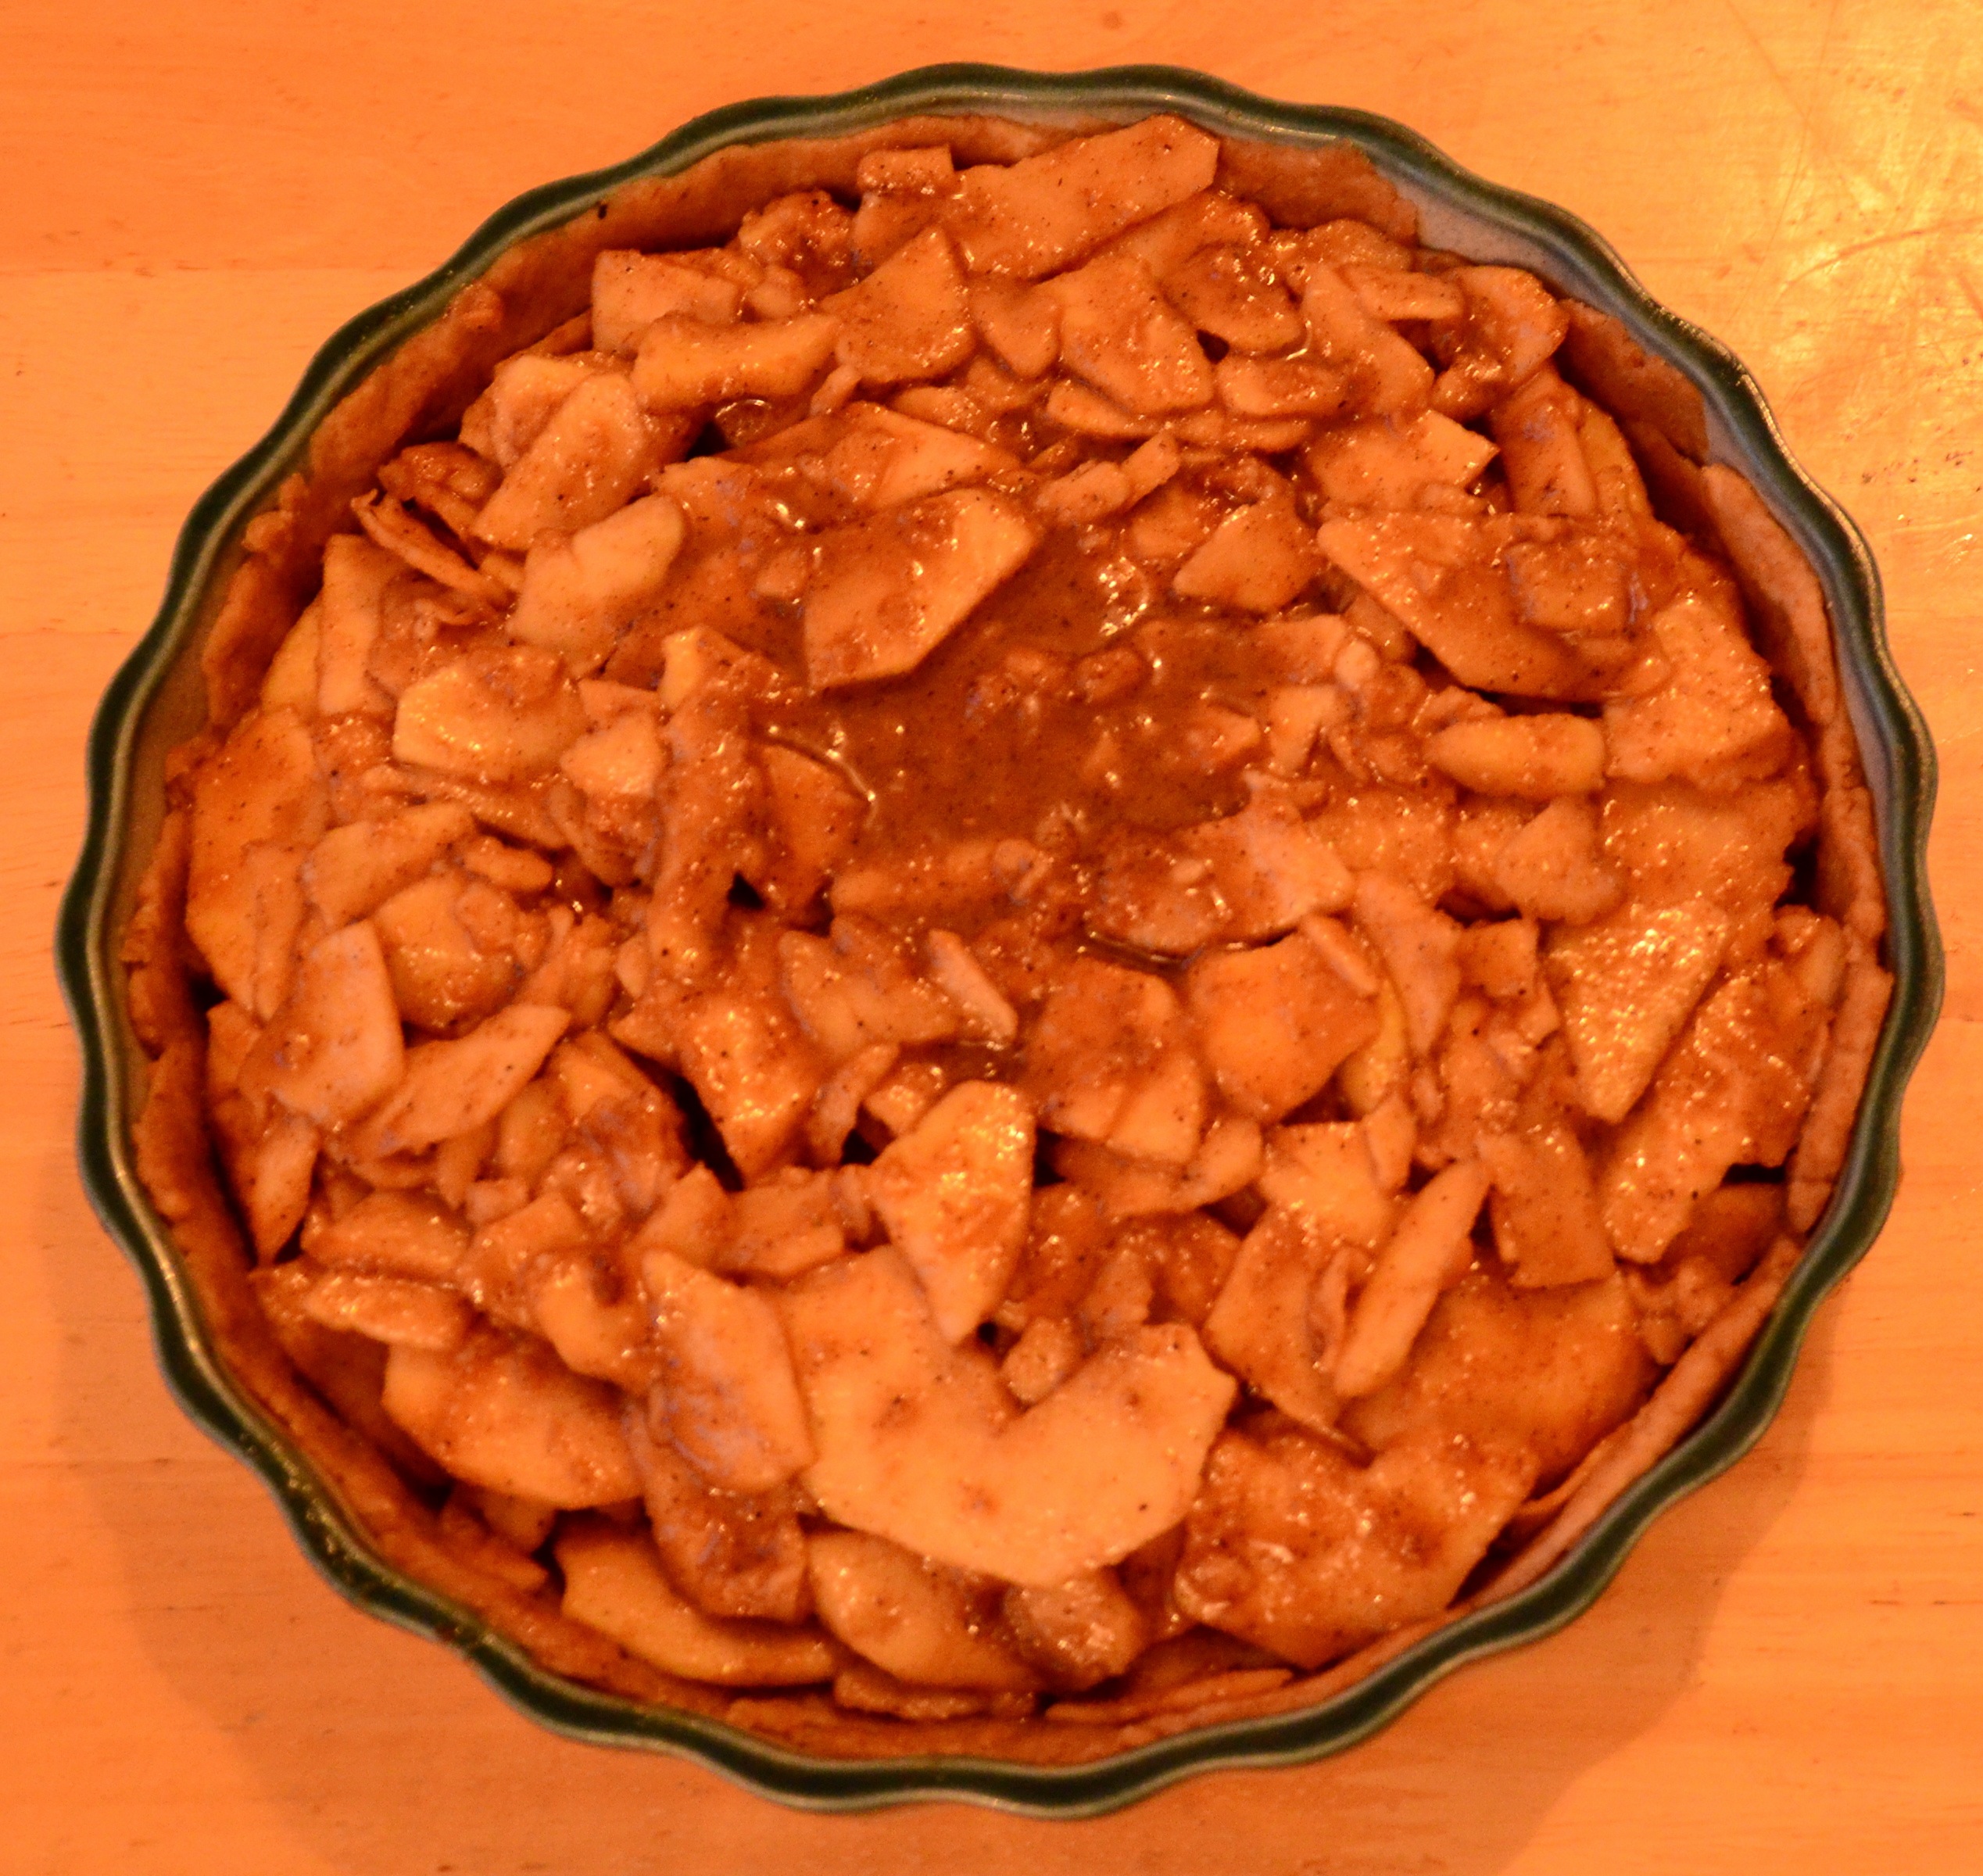
O the bad lighting, pitart filling!

Cover it up, pop into the fridge and take out the dough for the top.

The Roof! Roll out the dough for the top layer. It should be a little thinner and bigger than the base. This is so it will cover the apples and there is enough to crimp the dough where it meets the base. Gently use your rolling-pin to lift it again. Tuck the edges into the pitart and crimp/ press the edges together so the apples cannot escape! Put five slits into the top so all the steam can escape. I had a tiny bit of dough left so I stuck on a badly shaped heart! darn I should have made an apple shape.

Covered up, I used a fork on the edges

Covered up, I used a fork on the edges

Pour your prepared vanilla-y topping mixture over the top and stick into the middle of your preheated oven.

After fifteen to twenty minutes turn the heat down to 180C / 350F. I find it is usually starting to brown at this stage. If not give it another few minutes. Do not open the oven to check. Use a torch if you do not have an oven light see what is happening. I have used torches, bike lights and currently its a radio with a light on it that doubles as my oven spy.

Once browning cover it with a loose tinfoil dome, do NOT tuck all the sides. I push two points under, just to hold it in place. The pie/ tart needs to breath, the tinfoil tent is to stop the pastry burning.

Bake the pie/tart for a total of 50mins, it may even take 60min in a non fan oven. It takes this long as there is no blind baking and a lot of filling.

Take out and leave it too cool for 30minutes. I know I know after all that you have to wait again. The insides need to cool, if you cut it straight away it could be all runny.

I will take a photo again tomorrow as the light is so awful the pie looks weird!

Low light Armadillo Apple pie or Armoured Apple tart!

Low light Armadillo Apple pie or Armoured Apple tart!

Hope you like this mash of pie and tart. It is sweet and caramel-y and has filled my flat with smells that remind me of my Mum and Nana. Just need to get some vegan vanilla ice-cream to have it with tomorrow! 🙂


No bake Coconut Coffee Pie- gluten free vegan yumminess

31 Sunday Aug 2014

Posted by Aissa in Gluten Free, No bake/ Raw, Superfoods, Tart, Vegan

≈ Leave a comment

Tags

Gluten free, No bake, Tart, Vegan

This is a creamy coffee wonder of a pie. A little bit of effort is required but you can’t really go wrong as you are just putting everything together! You also need to either soak your cashews overnight or for about 8 hours. I only have a hand held blender so I soaked mine overnight to make ’em extra soft!

I was a bit nervous making it as you need to get your proportions right when getting something to set like a cheesecake. Also when a pie requires a lot of agar agar(seaweed) to set it it can go a bit jelly/jello like. I wanted rich and creamy not watery and wobbly! 🙂 My solution was extra coconut and half an avocado. It worked!!!

I love me my fair trade coffee so I had coffee with my Coconut Coffee Pie. I also made it quite coffee-ey so if you want a milder hit then use one spoon of coffee extract not two.

my tent collapsed and marked my pie top! :-(

my freezer tent collapsed and marked my pie top! 😦

You will need a 20cm or 7.5inch tart/pie tin. A hand blender or a fancier blender if you have one. Measures. A few bowls and a small saucepan!

No Bake Coconut Coffee Pie

The Base

  • One and a half cups of ground almonds
  • Half a cup of ground walnuts (approx. 80g whole nuts)
  • Quarter teaspoon of himalayan pink salt or good sea salt
  • One and a half dessertspoons of cacao powder
  • A teaspoon of vanilla powder/ bean paste that is low alcohol / one pod
  • Two dessertspoons organic coconut oil
  • A third of a teaspoon of almond extract
  • Four dessertspoons/ a quarter cup of maple syrup

The Topping

  • Half a cup of cashew pieces soaked overnight in a little water and non diary milk. Just enough to cover the nuts.
  • 300g/ approx. 330ml of Coyo Coconut yoghurt*
  • One teaspoons of organic coconut oil
  • Optional: Two dessertspoons of the cream from the top of a can of coconut milk
  • A full teaspoon of vanilla powder/ bean paste/ pod
  • Half an avocado blended with a spoon of the milk that the cashews were soaked in.
  • Two teaspoons of lemon juice also blended with the avocado
  • Four dessertspoons of raw dark agave
  • Four dessertspoons of maple syrup
  • Three quarters of a cup coffee- I made drip coffee
  • Two teaspoons of coconut oil
  • Two teaspoons of coffee extract
  • One teaspoon of agar agar powder
  • Optional: A teaspoon of desiccated/ shredded coconut for decoration

*This coconut yogurt is really set- almost as set as a soft cream cheese. You could use a vegan cream cheese- make sure it is unsweetened or if you have a good blender fresh coconut meat instead!

The making of the pie!

The base is really easy. The only bit that requires work is blending the walnuts! My coffee grinder did okay once I chopped them a bit first!

Mash your coconut oil and almond extract together, if using vanilla bean paste add it now. Mash in your maple syrup.

In another bowl dump in your ground almonds and walnuts. Press out any major lumps. Add the cacao powder, salt and vanilla powder. Stir it all together so it is all one colour.

Put the dry ingredients into the oil mix. Start by mixing it with your spoon, pressing so the oil is taken up by the dry. You will need to get in there with your hands, as you go past stirring and into pressing everything together! It should form a ball of dough, like  biscuit/ cookie dough. See the pic.

Press in pie base

Press in pie base

Grab your pie/tart tin/pan!! So many options!! Rub it with some coconut oil to prevent sticking. If using a spring form pan line it with some greaseproof paper.

Now press in your pie base. Make sure to do it evenly. Wow betide the uneven base!! Now cover it up with paper or cling-film and stick it in the freezer.

The pie topping is where extra bowls and the saucepan come in to use.

Put on a pot of drip coffee. So that you can have a cup too! Or brew a moka pot that makes a proper cupful.

First: Grab your bowl of soaked cashews and strain most of the milky water off them. Keep the milky water for helping to blend the avocado later.

blended cashews

blended cashews

Add in the teaspoon of coconut oil. Add the vanilla powder/paste/pod and the two dessertspoons of cream from the top of a can of coconut milk. (I was making a curry for dinner so used the rest of it in that)

Now blend it all together. My little hand held blender did a pretty good job of these. I am sure a more powerful one would blend them to a cream which would be lovely. Set aside while you get on with the rest.

In another bowl get your half an avocado and blend it with a dessertspoon of your milky water from the cashews and two teaspoons of lemon juice. Add this to the cashew mix and mix or blend everything together.

Plus green goody avocado

Plus green goody avocado

Now gently fold in your coconut yoghurt. I did not blend again as I did not want to knock the air out of the yogurt. If you are using vegan cream cheese it would be fine to blend. You will have to blend it if your using fresh coconut meat.

Nearly there!! Put a small saucepan on to a medium high heat. Pour your three quarters of a cup of coffee into this and add in the coffee extract, agave and maple syrup. Sprinkle in your teaspoon of agar agar powder. Bring it all to a rolling boil while making sure to stir pretty consistently. Reduce the heat so it stops boiling and let it cook for another four or five minutes, making sure to stir so all the agar does not end up on the base. Stir in two teaspoons of coconut oil.

Take your base out of the freezer so it is ready to go. Lay it on top of a big square of greaseproof, cling-film or foil. This is so afterwards you can make a tent of it, that will cover the pie but not touch and mark the pie while it sets.

Take your saucepan off the heat. From a height (so the air cools it a little on the way down) pour the coffee mixture into your coconut etc mix. Make sure to gently stir at the same time. Pour the mixture on top of your pie base. Make your tent roof like structure. Hopefully a better job than mine, ‘cos mine collapsed overnight and made the top look like a coffee lake! Though I left mine to set overnight, partially so I was not tempted to stick a finger in it, it would probably be set in a few hours. I also store the pie in the freezer as it is lovely served cold and helps it last. This would also be lovely done as little ramekins or jars so you could serve individual desserts. I sprinkled mine with a little desiccated/ shredded coconut for decoration. Ta Da! Pie!

So TaDa! Here is the picture again. Xs Aissa

my tent collapsed and marked my pie top! :-(

It’s so Greeeeen! It’s so goood!

27 Wednesday Aug 2014

Posted by Aissa in Fermentation, juice, Natural Health, Superfoods, Vegan

≈ Leave a comment

Tags

Fermentation, Juice, Natural Health, Superfoods, Vegan

My diet to today had been lacking. Lacking in particularly in greens. So my juice this afternoon had a lot to make up for. So the green goodies were pulled from the fridge with instructions to be very good for me. Nothing wrong with talking to your juice prep.

So Green! So Good Juice

So Green! So Good Juice

So Green! So Good! Juice

  • Two rainbow chard leaves and stalks
  • Half a large cucumber
  • One tart unwaxed green apple- I used a Collina apple
  • Ten leaves and stalks of parsley
  • Fifteen leaves and stalks of coriander
  • An inch size piece of turmeric root
  • A bundle of wheatgrass about an inch in diameter
  • Optional double shot size of water kefir- for the good bacteria and yeasts!

It tastes sweet, but not overly, but mainly of coriander. Quite refreshing! Feeling healthier as I sip!!! 🙂

Chlorophyl helps oxygenate the blood. Herbs are great for the digestion and packed with vitamin C. Evidence to say coriander helps get rid of heavy metals from the body. Great source of iron. B vitamins, for mood, the nervous system, tissue repair. Must not forget wheatgrass superoxide dismutase! Check it out- amazing anti-inflamatory!

It makes double the amount in the pic. I am saving the other glass for my partner. I put  in a pinch of vitamin C powder- to help keep it and stuck it in the fridge.

Hope you try it out! Xs Aissa

Yoga to look at not to do…maybe

20 Wednesday Aug 2014

Posted by Aissa in Natural Health, yoga

≈ Leave a comment

Tags

Natural Health, Yoga

Found this deadly (Irish saying for cool ) yoga video. I innocently thought I would follow along. HA! Like that was going to happen! I ended up attempting to do Cobra pose A LOT. Every time “mr super bendy strong guy” did a hand stand I did Cobra. I did do my more simple version alongside his advanced one. I found it worth a watch. It showed how all the yoga poses I do can be combined and advanced upon in an almost dance like manner. So for your inspiration. Or if you are at that level you could practice along to it maybe…

Nature Rocks! Look what I found in my Pak Choi!

19 Tuesday Aug 2014

Posted by Aissa in Natural Health, Vegan

≈ 3 Comments

Tags

Natural Health, Vegan

Photo Post! The stems where cut off this Pak Choi at work, leaves for the juicin’. Look what was inside! A flower. Fibonacci Spiral Power, it is hiding everywhere. I just had to share 🙂

Pak Choi Flower

Pak Choi Flower

Xs Aissa

Brmufka- bread muffin cake Recipe

17 Sunday Aug 2014

Posted by Aissa in Bread, Cake, Cupcakes, Vegan

≈ 2 Comments

Tags

Bread, Cake, Cupcakes, Vegan, Vegan icing/ frosting

The world is chaos and the lack of order has impeded my ability to blog. That there is the excuse to preempt my apologies.

My Brmufka- bread muffin cake, is the tale of a cake that went wrong and still tasted good. It tastes like a sweet bread- which I compensated for by covering it in a coconut yoghurt icing/frosting. I normally bake gluten free or at least wheat free, but not this time. There was a bag of whole wheat self-raising flour at work, it had had a hole poked in it. So rather than throw it out I thought I’d make cake!

brmufka with pink coconut yogurt icing

Brmufka with pink coconut yogurt icing

To make your own Brmufka- bread muffin cake you will need the following-

A 20cm/7.5inch cake tin. Greased with a little square of parchment paper on the base to prevent sticking! Measures and bowls…and an oven. More specifically one preheated to 170C/340F

  • 2 generous cups of whole wheat self-raising flour
  • 1 teaspoon of baking powder
  • Half a teaspoon of bread soda/baking soda
  • Half a teaspoon of ground cardamom
  • Quarter teaspoon of sea salt/himalayan pink salt
  • Half a teaspoon of vanilla powder/ or 1tsp of extract in the wet stuff!
  • Three quarters a cup of rapadura/turbinado/sucucant sugar
  • Note I used half a cup- hence Brmufka so it’s up to you what you want to do!!
  • Two dessertspoons of coconut oil worked to soft or melted
  • Three dessertspoons sunflower/rapeseed/canola oil (ones suitable for frying)
  • Seven drops of food grade orange oil or the zest of one orange
  • Half a cup of apple puree
  • Half a cup of non-diary milk
  • Half a teaspoon of apple cyder vinegar
  • A quarter cup of water or orange juice

Get your bowl and put in flour,baking powder, soda, cardamom, salt and vanilla. You can just add your sugar, but I sieve mine first as it gets out the lumps and makes for a lighter cake.

Put you apple puree, milk, quarter cup of water or juice and the vinegar.

Get another bowl and work your oils together, add the orange oil and or orange zest. Pour the apple puree milk etc mix on top and mix them together.

Make a well in the centre of your dry ingredients and pour in the wet. Gently fold together. Just so there are no lumps. You want a light touch so you do not knock the air out or end up kneading it !!

Here is where the BR part of the Brmufka happened. Having been out of the habit of wheat, I over mixed- this developed the gluten- hence making it more bready. But there is more, I was going to make a low flat cake- like fingers and spread it on a baking sheet. I started doing this, realised I didn’t have enough batter changed my mind and then put in the cake tin. Over worked even further !!!

Pop it into the middle of your pre-heated oven. My oven is hotter on the left so I place things slightly to the right.

The Muf part is due in partially to the whole wheat-ness, also to the fact when I tried to gently transfer it to my cake pan it had thickened and the surface was uneven. When it baked it came out with a domed spiky top like muffins!

It took 24mins in my fan oven. It may take up to 30mins in a non-fan. You could make it into real muffins / cupcakes and they would take 18-20mins.

It will be done when it is coming away from the sides, is golden brown and has a little cracking on the surface. If it looks good take it out and stick a skewer in it. If that comes out dry you have a Brmufka or a cake if added more sugar and didn’t overwork it 😉

Brmufka pacman- pre icing

Brmufka pac-man- pre icing


Pink Coconut Icing

This is so easy. In a medium sized bowl

  • One dessertspoon of coconut oil- mashed to soft
  • Four giant dessertspoons of berry coconut yogurt*
  • A mug/ generous cup of organic icing sugar
  • Half a teaspoon of vanilla powder/ insides of a pod
  • If needed a teaspoon of warm water

*if you use plain just squash a strawberry into it or add a teaspoon of beetroot powder to make it pink. If you use the beetroot powder you need a few drops of water for the colour to release.

Mash your oil and yogurt (if needed the berry) together. Sieve the icing sugar into the bowl (and beetroot powder if using). Add the vanilla and mix it all together. Really get your back into it so that you get a nice smooth consistency. if too stiff or powdery add a bit of water. If too runny add a bit more icing sugar.

If you have made cake as opposed to Brmufka you may not need as much icing 🙂

Xs Aissa

Brmufka- bread muffin cake!

07 Thursday Aug 2014

Posted by Aissa in Cake, Vegan

≈ Leave a comment

Tags

Cake, Vegan

Recipe coming soon for my vegan whole wheat “Bread muffin cake”. The cake where everything went wrong but it still tastes good, and they look like Pacmen!!

brmufka pacman- pre icing

brmufka pacman- pre icing

brmufka with pink coconut yogurt icing

brmufka with pink coconut yogurt icing

Post soon! Xs Aissa

Orange that is Green juice + raw experiments +yoga

04 Monday Aug 2014

Posted by Aissa in Chocolate, Gluten Free, juice, Natural Health, No bake/ Raw, Superfoods, Tart, Vegan, yoga

≈ Leave a comment

Tags

Chocolate, Gluten free, Juice, Natural Health, No bake, Superfoods, Tart, Vegan, Yoga

Experiments in other people’s raw recipes!

So I was given the generous gift of “Rawsome vegan Baking” by a friend of mine. It is a beautiful book, everything is explained well and concisely. I am not kited out with dehydrators and vita-mixes but there is still a lot I can make or improvise around. One of the great guys I work with was leaving and I wanted to make something. This is always a risky thing to do. To make something for some one using a recipe from a new cookbook (or not cook as the case maybe)!!! It turned out lovely. I made “Avocado Mint Cream Bars with chocolate, two ways” on p.106. My only quibbles were I had to increase the ingredients to fit my tart pan. It says a 9inch square pan or 23cm is fine. I used a 7.5/8inch 20cm round pan and the measurements were definitely short. I had enough ingredients to increase the amounts but it made it a bit stressful. The avocado layer could have been thicker too. It was a little too sweet for me. I often find this though, I should have known to reduce the sweet stuff a little for my palette. Here is a picture

My Rawsome Vegan Life Avocado Mint cream bars

My Rawsome Vegan Life Avocado Mint cream bars

Here is a pic from Emily’s blog of what they should look like! Maybe it was the lack of a proper blender. Either way it tasted nice…even if it was less pretty 😦

The real deal!

The real deal!

http://www.eatgood4life.com/avocado-mint-cream-bars/ Has written up the recipe if you want to check it out. In the original you can use fresh coconut meat instead of a banana. I being blenderless went for the banana option.

Yoga

I went for a more challenging routine today. I had the time, I’m off work today ‘cos it is a bank holiday here. It was good. I was very surprised at what I found hard. About 25mins in there is a pose where you squat and grab hands through one knee and attempt to stand up. The first time doing it you keep your legs in a half bend. I had to come out of the pose! Horror! Horror! My thighs could no take it! (Scotty from Star Trek voice!) But I kept going and attempted the full pose where you straighten your legs. SOOOO much easier. Therefor revealing my need to do more chair poses!

There is precise instruction on options to get into a head stand, also great description of getting into crow. Wish I’d seen the crow one back when I had been attempting it first! I did my head stand against the wall. Though I am getting more confidant and I didn’t lean against it. Glad I did as I wavered and wobbled a bit and needed something behind me! 🙂

And finally juice. Orange that is green Juice 

  • Wheatgrass- a 1inch diameter bundle
  • Three or four chard leaves
  • One unwaxed red apple
  • One unwaxed big orange
  • Three inch piece of cucumber
  • Six mint leaves
  • A half inch piece of turmeric
  • A quarter inch piece of organic ginger (i.e not irradiated!)
  • Optional: shot of water kefir
Colours!

Colours!

This juice was like a trick. It tasted sweet and citrusy orange but was totally green. Enjoyable for that reason alone, but it tasted lovely too!

orange is green juice

orange is green juice

Hope that you try some of these things out! Xs Aissa

Refreshing Bendy Yoga

03 Sunday Aug 2014

Posted by Aissa in Natural Health, yoga

≈ Leave a comment

Tags

Natural Health, Yoga

Hey! Sundays seem to be the day that I share a yoga vid. Accidental routine 🙂 This one is really versatile, you could follow the first eight mins just to have a lovely stretch! The instructor gives options along the way, so if you are a rubber band god you will be as satisfied as the mere mortals. It has some of my fav poses- I can’t do a yoga routine without pigeon and mermaid. I also liked the way it flowed from one move to another quite eloquently. I really felt the benefit of the opposing positions, made me realise I do not do enough of them in my normal routine. Guilty face – is there an emoticon for a guilty face? ]-( – nope that is a sad robot. I digress. Here is the video. Hope you like it. Xs Aissa

NOT a Juice fast day with Juice recipes!

27 Sunday Jul 2014

Posted by Aissa in juice, Natural Health, Superfoods, Vegan

≈ 1 Comment

Tags

Juice, Natural Health, Superfoods, Vegan

The Juice Fast is off! Sooo usually I feel great when I do a juice day. By yesterday evening I wasn’t “feeling it”. I left my place late and had almost run into town to meet up with a friend and go to the farmer’s market. Delighted to be able to stock up on leaves for juicing and a strange craving for plums! I had a carrot beetroot and ginger juice while there and was treated to a chemex drip coffee! By the time I was home in the evening I was feeling a bit off, not filled with energy and joi d’vivre. I thought the Evening Juice here would be the pick me up. It lasted for a bit, but my tummy felt gurgly I started to feel bit headachy. This is not how I would usually feel on juice. The quick delivery of energy and nutrients normally keeps me satisfied. I had made sure to stay hydrated, I put celery in my juice for salts. So I had a mug of miso soup, a half an hour later I decided my body was trying to tell me something and I should listen to it. So I had some peanut butter before going to bed and decided I would see how I was this morning.

In the past when doing juice days I would wake up feeling energised, clear headed and a little hungry. I would have water and a giant juice with fruit in it. I woke up with a crampy tummy and generally feeling unwell. So juice fast is off. It is disappointing to not be able to see something through that you have planned for. I am doing this for my health, to support my body. I may have an idea in my head but my body was not on board with it. If I am coming down with something and I need to be nourished with solid nutritious foods that is what I will have. I am still strictly off gluten and sugar, which is a good idea anyway. Sugar feeds bad bacteria, gluten doesn’t suit me very well. I think it makes my period pains worse too!

I am currently sipping a green juice and I will share last nights and todays juice recipes with you now!

evening veg juice the before shot

evening veg juice the before shot

Evening Veg Juice

  • Six rainbow chard leaves
  • 6inchs/ 15cms cucumber
  • Two small white cabbage leaves
  • A stalk of celery
  • One endive
  • A beetroot
  • An inch in diameter bundle of wheatgrass
  • Three coriander stems and leaves
  • A small nub of turmeric- size of top of your baby finger
  • A thin slice of organic ginger
  • Optional: Two double shots of water kefir

This has a light sweetness due to the beetroot and wheatgrass. Overall it is pretty savoury though. Take it easy on the cabbage if you are new to juicing. It is pretty strong stuff. In past I have done up to four leaves of red cabbage in juices. Since I was feeling a bit delicate I just did two. It is very good for you if it suits, rich in l-glutamine which can be good for the gut.

Evening juice the after shot

Evening juice the after shot

I had my Not so smooth energy smoothie for breakfast, made with frozen berries. Yummy. I had a green juice this afternoon, fruity and lemony, it is pretty good, if I don’t say so myself! 😉


Green as Irish grass!

Green as Irish grass!

Green lemony Juice

  • An inch in diameter bundle of wheatgrass
  • Three big green chard leaves and stalks
  • A sprig of coriander stem and leaves
  • An unwaxed green pear
  • An unwaxed apple
  • An unwaxed very big lemon- which was pretty green!
  • A slice of turmeric the size of the tip of my baby finger
  • A slice of ginger the same size

Tasty, lemony, sweet and sour bright green juice.

The weather is dependably changeably here. The rain is a bit disappointing after a week of glorious sun. But you can see the blue is trying to come out again.

Rain

Rain

Hope all is well with you guys. I’m off to have an avocado salad for dinner! Xs Aissa


← Older posts
Newer posts →

Subscribe

  • Entries (RSS)
  • Comments (RSS)

Archives

  • February 2017
  • August 2016
  • April 2016
  • March 2016
  • January 2016
  • December 2015
  • November 2015
  • September 2015
  • August 2015
  • July 2015
  • June 2015
  • May 2015
  • April 2015
  • March 2015
  • February 2015
  • January 2015
  • December 2014
  • November 2014
  • October 2014
  • September 2014
  • August 2014
  • July 2014
  • June 2014
  • May 2014
  • April 2014
  • March 2014

Categories

  • Biscuits
  • Bread
  • Cake
  • Chocolate
  • Cookies
  • Cupcakes
  • Fermentation
  • Gluten Free
  • juice
  • Natural Health
  • No bake/ Raw
  • Savoury
  • Superfoods
  • Sweets
  • Tart
  • Traditional
  • Uncategorized
  • Vegan
  • Vegan Smoothie
  • yoga

Meta

  • Create account
  • Log in
Follow VeganEtcetera on WordPress.com

Create a free website or blog at WordPress.com.

Privacy & Cookies: This site uses cookies. By continuing to use this website, you agree to their use.
To find out more, including how to control cookies, see here: Cookie Policy
  • Subscribe Subscribed
    • VeganEtcetera
    • Join 93 other subscribers
    • Already have a WordPress.com account? Log in now.
    • VeganEtcetera
    • Subscribe Subscribed
    • Sign up
    • Log in
    • Report this content
    • View site in Reader
    • Manage subscriptions
    • Collapse this bar
 

Loading Comments...